
cPanel是当前世上功能最强大,最容易使用,最受用户欢迎的虚拟主机控制系统,很多国外主机主机都使用这套控制面板。
我们需要安装EPEL库来启动这个进程
第一步:安装EPEL库
root@server1[/usr]#yum-yinstallepel-releaseLoadedplugins:fastestmirror,tsflags,universal-hooks
Loadingmirrorspeedsfromcachedhostfile
*extras:mirrors.linode.com
*updates:mirrors.linode.com
-->Runningtransactioncheck
--->Packageepel-release.noarch0:7-5willbeinstalled
-->FinishedDependencyResolution
DependenciesResolved========================================================================================PackageArchVersionRepositorySize========================================================================================Installing:
epel-releasenoarch7-5extras14k
第二步:安装nDeploy的CentOSRPM库
可以安装nDeploy的CentOSRPM库来安装我们所需的nDeployWeb类软件和Nginx插件
root@server1[/usr]#yum-yinstallhttp://rpm.piserve.com/nDeploy-release-centos-1.0-1.noarch.rpmLoadedplugins:fastestmirror,tsflags,universal-hooks
nDeploy-release-centos-1.0-1.noarch.rpm|1.7kB00:00:00
Examining/var/tmp/yum-root-ei5tWJ/nDeploy-release-centos-1.0-1.noarch.rpm:nDeploy-release-centos-1.0-1.noarch
Marking/var/tmp/yum-root-ei5tWJ/nDeploy-release-centos-1.0-1.noarch.rpmtobeinstalled
-->Runningtransactioncheck
--->PackagenDeploy-release-centos.noarch0:1.0-1willbeinstalled
-->FinishedDependencyResolution
DependenciesResolved========================================================================================PackageArchVersionRepositorySize========================================================================================Installing:
nDeploy-release-centosnoarch1.0-1/nDeploy-release-centos-1.0-1.noarch110
第三步:安装nDeploy和NginxnDeploy插件
root@server1[/usr]#yum--enablerepo=ndeployinstallnginx-nDeploynDeployLoadedplugins:fastestmirror,tsflags,universal-hooks
epel/x86_64/metalink|9.9kB00:00:00
(1/4):ndeploy/7/x86_64/primary_db|14kB00:00:00
(2/4):epel/x86_64/group_gz|169kB00:00:00
(3/4):epel/x86_64/primary_db|3.7MB00:00:02
DependenciesResolved========================================================================================PackageArchVersionRepositorySize========================================================================================Installing:
nDeploynoarch2.0-11.el7ndeploy80k
nginx-nDeployx86_641.8.0-34.el7ndeploy36M
Installingfordependencies:
PyYAMLx86_643.10-11.el7base153k
libeventx86_642.0.21-4.el7base214k
memcachedx86_641.4.15-9.el7base84k
python-inotifynoarch0.9.4-4.el7base49k
python-lxmlx86_643.2.1-4.el7base758k
TransactionSummary========================================================================================Install2Packages(+5Dependentpackages)
我们在自己的服务器上安装了Nginx插件,按照以上步骤完成了安装。现在我们可以配置Nginx作为反向代理和为已有的cPanel用户账户创建虚拟主机,为此我们可以运行如下脚本。
第四步:启动Nginx作为默认的前端Web服务器,并创建默认的配置文件
root@server1[/usr]#/opt/nDeploy/scripts/cpanel-nDeploy-setup.shenableModifyingapachehttpandhttpsportincpanel
httpdrestartedsuccessfully.
Createdsymlinkfrom/etc/systemd/system/multi-user.target.wants/nginx.serviceto/usr/lib/systemd/system/nginx.service.
Createdsymlinkfrom/etc/systemd/system/multi-user.target.wants/ndeploy_watcher.serviceto/usr/lib/systemd/system/ndeploy_watcher.service.

ConfGen::satest
你可以看到这个脚本将修改Apache的端口从80到另一个端口来让Nginx作为前端Web服务器,并为现有的cPanel用户创建虚拟主机配置文件。一旦完成,确认Apache和Nginx的状态。
Apache状态:
root@server1[/var/run/httpd]#systemctlstatushttpd●httpd.service-ApacheWebServer
Loaded:loaded(/usr/lib/systemd/system/httpd.service;enabled;vendorpreset:disabled)
Active:active(running)sinceMon2016-01-1806:34:23UTC;12sago
Process:25606ExecStart=/usr/sbin/apachectlstart(code=exited,status=0/SUCCESS)
CGroup:/system.slice/httpd.service
24760/usr/local/apache/bin/httpd-kstart
Jan1806:34:23server1.centos7-test.comsystemd[1]:StartingApacheWebServer...
Jan1806:34:23server1.centos7-test.comapachectl[25606]:httpd(pid24760)alreadyrunning
Jan1806:34:23server1.centos7-test.comsystemd[1]:StartedApacheWebServer.
Nginx状态:
root@server1[~]#systemctlstatusnginx●nginx.service-nginx-nDeploy-highperformancewebserver
Loaded:loaded(/usr/lib/systemd/system/nginx.service;enabled;vendorpreset:disabled)
Active:active(running)sinceSun2016-01-1717:18:29UTC;13hago
Docs:http://nginx.org/en/docs/
CGroup:/system.slice/nginx.service
├─3833nginx:masterprocess/usr/sbin/nginx-c/etc/nginx/nginx.conf
├─25473nginx:workerprocess
├─25474nginx:workerprocess
└─25475nginx:cachemanagerprocess
Jan1717:18:29server1.centos7-test.comsystemd[1]:Startingnginx-nDeploy-highperformancewebserver...
Jan1717:18:29server1.centos7-test.comnginx[3804]:nginx:theconfigurationfile/etc/nginx/nginx.confsyntaxisok
Jan1717:18:29server1.centos7-test.comnginx[3804]:nginx:configurationfile/etc/nginx/nginx.conftestissuccessful
Jan1717:18:29server1.centos7-test.comsystemd[1]:Startednginx-nDeploy-highperformancewebserver.
root@server1[/usr/local/src]#netstat-plan|grephttpdtcp000.0.0.0:44300.0.0.0:*LISTEN17270/httpd
tcp000.0.0.0:99990.0.0.0:*LISTEN17270/httpd
tcp600:::4430:::*LISTEN17270/httpd
tcp600:::9999:::*LISTEN17270/httpd
root@server1[/usr/local/src]#netstat-plan|grepnginxtcp00127.0.0.1:800.0.0.0:*LISTEN17802/nginx:master
tcp0045.79.183.73:800.0.0.0:*LISTEN17802/nginx:master
为已有用户创建的虚拟主机的配置文件在“/etc/nginx/sites-enabled”。这个文件路径包含了Nginx主要配置文件。
root@server1[/etc/nginx/sites-enabled]#ll|grep.conf-rw-r--r--1rootroot311Jan1709:02saheetha.com.conf-rw-r--r--1rootroot336Jan1709:02saheethastest.com.conf
一个域名的示例虚拟主机:
listen45.79.183.73:80;ServerNamesserver_namesaheetha.comwww.saheetha.com;
access_log/usr/local/apache/domlogs/saheetha.commain;
access_log/usr/local/apache/domlogs/saheetha.com-bytes_logbytes_log;
include/etc/nginx/sites-enabled/saheetha.com.include;
}
我们可以启动浏览器查看网站来确定Web服务器的工作状态。安装后,请阅读服务器上的web服务信息。
root@server1[/home]#ipa|grep-ieth03:eth0:mtu1500qdiscpfifo_faststateUPqlen1000
inet45.79.183.73/24brd45.79.183.255scopeglobaldynamiceth0
root@server1[/home]#nginx-vnginxversion:nginx/1.8.0
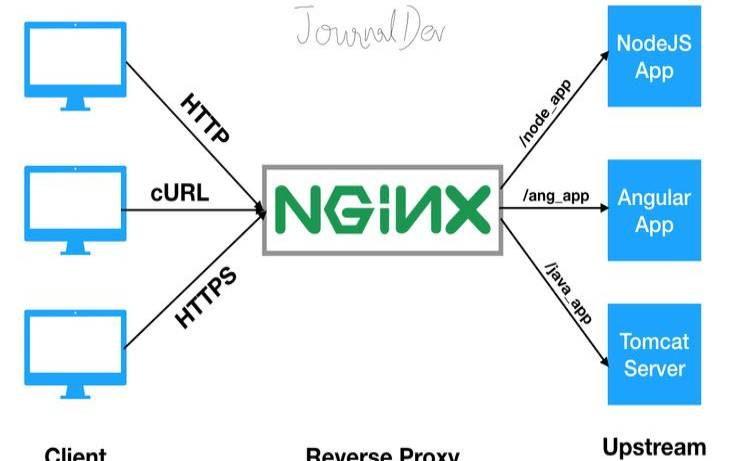
对该句话进行重写,可得到:对于在cPanel中新创建的所有账户,Nginx将会为它们创建虚拟主机。通过这些简单的的步骤,我们能够在一台CentOS7/cPanel的服务器上配置Nginx作为反向代理。
Nginx作为反向代理的优势
支持使用.htaccess作为PHP的重写规则。
以上就是CentOS7中怎么使用cPanel配置Nginx反向代理的详细内容,更多请关注主机测评网其它相关文章!
本文来源:国外服务器--linux使用nginx反向代理
本文地址:https://www.idcbaba.com/guowai/2465.html
版权声明:本文内容由互联网用户自发贡献,该文观点仅代表作者本人。本站仅提供信息存储空间服务,不拥有所有权,不承担相关法律责任。如发现本站有涉嫌抄袭侵权/违法违规的内容, 请发送邮件至 1919100645@qq.com 举报,一经查实,本站将立刻删除。


